Installing a Hudson CI Server on Amazon EC2 with Cucumber and Capybara and Github integration
Continuous integration is key to good development practices if you’re a team any larger than, well… one. But spinning up a CI server is still an exercise fraught with peril.
Add in getting one up for Rails that can deal with Cucumber and capybara testing (needing a browser for js testing) and rspec and if you don’t have someone with solid sysadmin skills, most teams throw up their hands. Also, if you’re doing this for short duration projects (yeah, I’m looking at you RailsRumble and Hack weekends), you really want something that you can spin up or down at will and not have serious iron dedicated to doing this. We chose to put ours on Amazon’s EC2. We chose Hudson, a rather excellent java CI server despite my personal feelings about java (and also the excellent hudson ruby gem that makes running it locally no effort at all).
Hopefully, this walkthrough will make it easy for you to do the same. Getting a CI server up shouldn’t be so difficult.
[While I’ve made this as simple as possible, this howto assumes a few things. You need to be comfy on the command line, able to spin Amazon servers up and know how that works, use git and github and it’s heavily slanted to a Rails developer using Test Driven Development with cucumber and capybara installed. If this doesn’t sound anything like you, your mileage may vary on this howto and it may not be for you. Okies?]
EC2 and spinning up an instance
We’re going to assume you know how to spin up and down instances on Amazon. If you don’t, you need to figure that out before you tackle this (thank me later, it’ll change your life.).
We chose a small instance, since we’re a small team. We’re in Australia so we chose to use the Singapore APAC data centre (despite a slightly higher cost) and we totally lurv Ubuntu for all our server needs so we picked the latest official LTS server release, the 10.0.4 LTS Lucid Lynx version. In Singapore, this corresponded to ami-00067852 32 bit for a small instance. So, go to your AWS web console
and fire up an instance.
Here are the other amis for the official Ubuntu releases
for Amazon, in case you are partial to a particular release (at time of writing, we used the 20101020 stable release of Lucid
. If you’re using US-West like most the small instance would be a 32bit ami-8c0c5cc9 or if you want something bigger, the 64bit ami-860c5cc3).
For security groups, make sure you leave web (port 80) and ssh (port 22) open.
You’ll also need to make sure you have a private key that can get into the server. I personally place mine in the .ssh directory. So, command line stuff with ssh runs as if that’s the case for you. Adjust accordingly if not.
Kick up the instance and once it’s running go back to your AWS web console and create a Virtual IP address and then associate it with the instance.You’ll also want to point a DNS A record like ci.your_domain.com at the IP address to make things easier.
Kick the tires on the instance once it’s running by making sure you can log in.
| |
(as a real world example)
Since we’re using keys and have a small team, I used the default ubuntu user for everything that was done here. As far as I can tell, this doesn’t cause any security risks.
Installing the base system
We have a pretty standard set of software we throw on our basic Linux stack. The only real divergence here is that I decided on nginx instead of apache due to lower memory usage and ease of config. Your mileage may vary and if you decide to change that feel free to put in apache if you’re more comfy with it. Nginx works fine though.
| |
Postfix will ask you about a mail domain so create one if it makes you happy like ci.yourdomain.com or hudson.yourdomain.com and you’ll also need to provide a root password to the MySQL (and don’t forget it).
Most of these are basic software or libraries but I’m assuming most of you don’t know what xvfb is. Xvfb is a virtual framebuffer for being able to run cucumber stories through firefox on the server so that your capybara dependent stories will run smoothly when they need javascript.
Using RVM for all your Rubies
You may want to go the apt-get route for installing ruby, but we decided to use RVM for doing the install of the rubies (this is owing mostly to a fantastic talk by @Sutto/Darcy Leacock at RailsCamp 8 in Perth, Australia on the Google Summer of Code work her did on rvm which gave me the idea.). Why? Mostly because rvm rocks for managing rubies and it seemed not so foolhardy. In any case, it seems to have panned out so we went with it anyhow. YMMV.
Installing rvm couldn’t be easier
| |
You do want to make sure that you change the shell here though
| |
(you’ll need to log out of the shell or use the unix tool screen to get this going. Make sure you do this or other things will fall over. Bash needs to at least execute this once.)
Also, run this
source ~/.rvm/scripts/rvm
and this
rvm notes
After that, you’re basically ready to roll with rvm. We like ruby 1.9 and are already using 1.9.2 for all our shenanigans (so much faster), so type this.
rvm install 1.9.2
(this should install ruby 1.9.2 and rubygems 1.3.7 (at time of writing))
You then want to set this as the default ruby to use so as not to confuse Hudson.
rvm --default 1.9.2
For completeness (and paranoia) get all the DB gems in there (probably overkill, but…)
rvm gem install sqlite3-ruby
rvm gem install mysql2
rvm gem install pg
rvm gem install rails
rvm gem install cucumber
rvm gem install capybara
rvm gem install hudson
Yeah, that was Hudson getting put in there. The entire java server. I know, crazy… It’s seriously that kinda easy. Well, almost. Java has rather strangely been removed from the default Ubuntu install which means you have to run off and get it before Hudson will work. Annoying, but easily remedied.
sudo add-apt-repository "deb http://archive.canonical.com/ lucid partner"
sudo apt-get update
sudo apt-get install sun-java6-jre sun-java6-plugin sun-java6-fonts
Oh, and set up your time zone just so you aren’t wondering why the Hudson server time seems out of whack. Easiest way to do that on ubuntu is to run the following
sudo dpkg-reconfigure tzdata
And follow the instructions to set the timezone.
Alright, now that we’ve got the server up and everything installed it’s on to the configuratoring…
Configuring nginx to serve and build hudson
Add this into your /etc/nginx/nginx.conf
| |
The first location entry simply tells nginx to act as a reverse proxy and serve up the goodness on post 3001 on the local machine. The second location is a set up to create an area for Hudson to receive a post-commit hook to build whatever project it is going to.
After you’ve done this and then ``/etc/init.d/nginx startto get the server to serve these URLs for the web server. Do a/etc/init.d/nginx stop` right after that though, once you’ve made sure it’s running.
Right now though, your server is completely naked security wise. So, we need to start up Hudson and configure its security (a bit further down) and set it up to be able to create builds when we kick it with the post commit hook post from GitHub (when you push your code to Github).
Configuring Git for GitHub
You need to generate a key to make this stuff automatic for the server
sudo su ubuntu
ssh-keygen -t rsa -C "you@your-domain.com"
Do not put a password on this key as you want this to pull from github without manual intervention so the server can do it.
Configure Git
git config --global user.email "you@example.com"
git config --global user.name "Your Name"
(ie. I used ci@getup.org.au and “Hudson CI”)
You now need to copy your ssh public key over to github so it knows that it can allow a deploy of code to that server. The feature in github is called Deploy Keys. If you’re in the ~ directory for the ubuntu user on the Ec2 instance.
vi .ssh/id_rsa.pub
Copy the info to the clipboard and then quit vi without saving.
Fire up your web browser and go on over to that fountain of awesomeness, that is github. Once there, go to your Account Settings and pick the SSH Public Keys option on the left hand side. Click the Add another public key option that gets presented. Call it Hudson CI Server (or whatever) and paste in the ssh public key you’d copied to your clipboard. Done.
Now, almost there. You need to get github’s key on the EC2 instance so that it’s all good to pull down code from that. So, you need to do the following strange little thing. From your EC2 instance, you need to ssh to Github to authenticate the EC2 instance with github. So, from the command line :
$ sudo su ubuntu
$ ssh git@github.com
If this is the first time your terminal will ask you if you want to add the key. Say yes. You will then get a message saying you’re authenticated but that login failed (as it should). But, now that you’ve done that, the EC2 instance should be able to pull from github without problem and without manual intervention.
Configuring xvfb - the virtual framebuffer
To be honest, adding in capybara javascript testing adds a serious level of complexity to setting up this server. Basically, you need a browser running in order to test that things are going as planned. So, the server needs to fire up a browser, basically in some sort of virtual or headless means in order to run the tests. Tricky. I found this the trickiest bit as you need to create an init script to spin up and spin down xvfb and also just make plain sure it works (even though you can’t see it working).
So, you need to set up Firefox and then create something for the Xvfb server.
In your ubuntu user directory
| |
Now put the following two lines in the user.js file:
| |
That’ll stop any weirdness if the js has to wait too long or similar strangeness.
After that, it is a (cough) simple matter of creating a script for spinning up and down the virtual framebuffer :
So, head on over to /etc/init.d/
Type in sudo vi xvfb
And insert the following :
XVFB=/usr/bin/Xvfb
XVFBARGS="$DISPLAY -ac -screen 0 1024x768x16"
PIDFILE=/var/hudson/xvfb.pid
case "$1" in
  start)
    echo -n "Starting virtual X frame buffer: Xvfb"
    /sbin/start-stop-daemon --start --quiet --pidfile $PIDFILE --make-pidfile --background --exec $XVFB -- $XVFBARGS
    echo "."
    ;;
  stop)
    echo -n "Stopping virtual X frame buffer: Xvfb"
    /sbin/start-stop-daemon --stop --quiet --pidfile $PIDFILE
    echo "."
    ;;
  restart)
    $0 stop
    $0 start
    ;;
  *)
  echo "Usage: /etc/init.d/xvfb {start|stop|restart}"
  exit 1
esac
exit 0
Save and exit the file and then change the permissions on the file to make sure it is executable. Do a ls -la on the directory to make sure the permissions on xvfb are the same as the other scripts in the directory.
This now allows you to spin the virtual framebuffer up and down as a service much like apache or mysql or what have you.
So, test to make sure it works :
sudo /etc/init.d/xvfb start
If you now do a ps aux on the server, you should be able to see xvfb running.
Now make sure you can shut it down as well :
| |
If that works well, you’re basically set up for everything that needs to be done that isn’t Hudson on the server. Almost beer-o-clock.
Configuring Hudson itself
There is a reason that CI servers have a bad reputation. They’re seriously a pain to configure and, as you can see going through this tutorial, it’s not exactly easy to figute out and requires a lot of DevOps knowhow in general. Thus the write up (in fact, I’m thinking of setting one of these up after I’ve had feedback and freezing it as an ami for public consumption).
The first thing you need to do (and trust me on this one, since we botched the security day 1 and spent a lot of time figuring out why things weren’t working is sorting out the security. Also, right now your install is largely unprotected.)
Start up the Hudson server on the command line. Using the rubiez makes this kinda awesome since you don’t need to mess with the java. Especially handy if you’re coming from the Rails and Ruby crews.
From a login on the command line as the ubuntu user :
nohup hudson server &
This makes sure the server starts and doesn’t kill off if you disconnect as well as moving it into a background process. In any case, give it about a 30 secs of boot up time and you should have a running install on your machine.
Remember to start nginx as well sudo /etc/init.d/nginx start
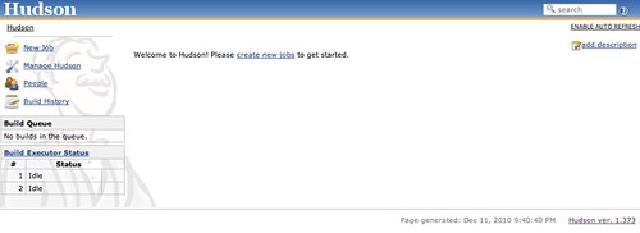
So, if all has gone well, you should be able to load up http://ci.your_domain.com into your web browser and see the Hudson screen.
Security is handled a bit strangely in Hudson, so we’re going to go with the absolute simplest way to handle this.

- Click the Manage Hudson link on the left hand menu.
- The first choice on the page that then loads up should be Configure System. Click it.
- Click the Enable Security checkbox
I really recommend using Hudson’s in built database unless you have a thing for mosochism:
Click Hudson's own user database and rather importantly, if counter-intuitively, the Allow users to sign up checkbox
Authorization should be Matrix-based security
Allow the Anonymous user just Read access.
Now this is the counter-intuitive part:
In the user/group to add box create a new user you are going to use for doing the builds like: buildbot and click Add
Give the user all the permissions (it’s just easier) and tick all the boxes. You should have something looking like this when you’re done.

Now here comes the strange part. Now you go and create the user log in for this guy (yeah… I know).
Anyhow, Go back to the main page and you’ll notice there is now a Signup link in the far right hand top corner. Click it and it’ll pop up a Signup form for you. Enter buildbot as the username, a relatively complex password, an email address and the captcha and hit submit. You now have a user in the system which should be able to build stuff.
Believe it or not, that’s the hardest part (imho, since it was rather counter-intuitive and I had to figure it out from a bunch of different sources. If Hudson people are reading this, puleeze change the way that your user accounts work. It’s nuts. Look at basic Rails logins plugins like Devise. Seriously soooo much better).
Check that you can log in and out and that the buildbot user in question has full access.
Adding plugins to Hudson
There are a dizzying array of plugins for Hudson, including one featuring Chuck Norris, so if you’re feeling like you may need something other than basics, do check around. We’re keeping this vanilla simple though, so Log into Hudson as the buildbot, hit the Manage Hudson link and then hit the Manage Plugins link.
make sure the following extensions are installed or go to Available and click on them to install them.
- Hudson Email extension plugin
- Hudson Environment File plugin
- Git plugin
- Github plugin
- Green Balls plugin (cause green is nicer than blue)
- Hudson instant-messaging plugin
- Hudson jabber plugin (if you want to use jabber for build notifications)
- Hudson email notification
- Rake plugin
- Hudson Ruby plugin
- Ruby metrics plugin
Note: There is also a great Campfire plugin available if that’s how you roll at your office. A lot of people seem to use that one though I haven’t tested it or used it myself yet.
Configuring your project to build automatically on Hudson
Now, we need to create a project and then have it build before we trigger it automatically. So, first off, make sure you’ve pushed a repo with a few nominal test in it just so you know it works. A couple of cukes with some javascript and of course, some rspecs.
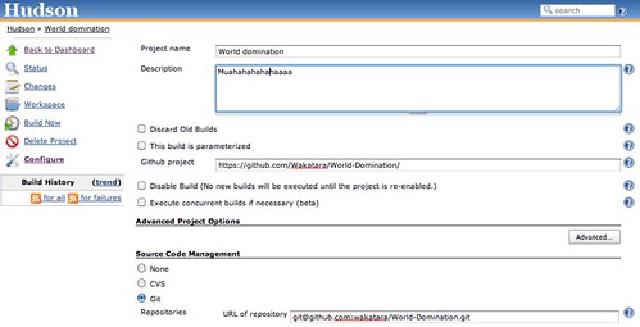
Alright, log in and you should be looking at a blank Hudson log in. Hit the New Job link, give the project a name (generally good if it’s the same as your repo) and select Build a free-style software project
That should bring you to a Project screen. Hit Configure Project
There are a multitude of checkboxes here, so it’s best to follow this pretty closely unless you know what you’re doing.
In Github Project fill in the URL to your repo ie. https://github.com/Github User/ProjectName/
Under Source Code Management tick git and then give it the URL of the repository ie. git@github.com:GithubUser/ProjectName.git

Under branches to build, enter the branch you push to github which is in development. For us, that happens to be develop (we use master for deployment to heroku)
Under Build you need to start filling the following in. This gets a bit tricky.
- Execute Shell
#!/bin/bashbundle install --without staging production - Invoke Rake (Rake version is default)
db:schema:load - Invoke Rake (Rake version is default)
db:test:prepare - Invoke Rake (Rake version is default)
spec - Invoke Shell
 # xvfb cucumber running woohoo!
 export DISPLAY=:99
 sudo /etc/init.d/xvfb start
 bundle exec cucumber
 RESULT=$?
 sudo /etc/init.d/xvfb stop
 exit $RESULT
Tick Publish Rails stats report (and have it set to ruby 1.9.2)
Tick Publish Rails notes report (and have it also set to ruby 1.9.2)
Now, under Post build actions
- Tick Public rcov report
- Tick email notification
- And fill in an email address to the team
- Tick Send email for every unstable build
- Tick Send separate e-mails to individuals who broke the build
This let’s the team know that someone has broken the build with their code push and that they need to fix it (the person who did it also gets a separate mail).
Test to make sure everything builds ok
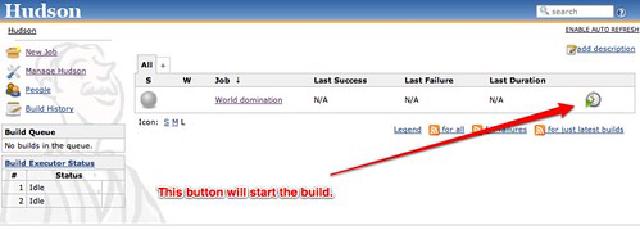
Now you’ve done all that, go back to the Hudson dashboard and look at the Project you’ve entered. All the way off to the right in the dashboard is a weird little clock icon with a green little play button. This is the Build Now button.

Code should get pulled from github and everything should build normally and you should see at least a pass or failure on your system.
Now you’ve got this working (if you don’t you need to go back in these instructions and figure out what went wrong. Sad panda.)
If it’s good to go, congratulations! You’ve basically done it. You can now just hook up github for doing the auto builds when things get pushed there.
Github Setup to send post-receive commit hook to the CI server
What we’re trying to do here is make github, after it gets a git commit on a particular branch (in our case, develop), to post to a URL on the Hudson server. This will trigger a build that then either passes or fails and let’s everyone know how things went. So, basically all devs have to do is what they are already doing: Push development code to github.
To that end, the location we put into the nginx config (way) above ends up providing a generic URL for github to be able to post to.
Now, we just need to visit GitHub and go to the repository that we want to use.
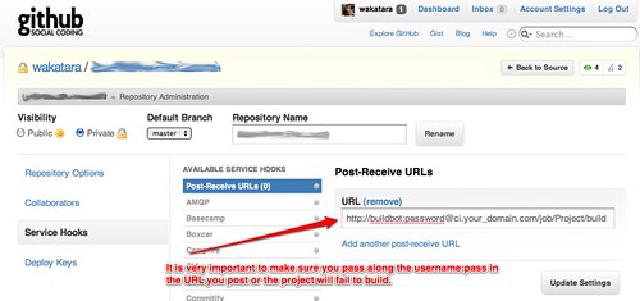
Go to your project and hit the Admin button. You’ll see a left nav item named Service Hooks
(if you haven’t already got the email hook setup to tell you when someone has pushed to github you should set that up as well. Very handy.)
Go to the link marked Post-Receive URL and put in the following :
http://buildbot:passwordForBuildBot@ci.your_domain.com/job/YourProjectName/build

Test pushing some code to the githib development branch and watch in amazement as it builds automagically in Hudson !
OK, so what now?
That’s it! You’ve done it! Woohoo !. Seriously, definitely Miller time for you and congratulations, you know have a running Hudson server that should keep you at least until the next new hawtness in CI comes out.

If you do see any ommissions, issues, security quirks, or problems with what I’ve done here or way things could be handled better, please comment so I can fix it up and continue to provide this as a resource for the community at large.
(By the way, I didn’t piece this altogether myself, so I have to thank my team at GetUp who were very patient after I said I thought I could get this thing up in a night (I, ahem… had to buy @kuperov coffee for a week after losing that bet =< ), our contractors from ThoughtWorks, as well as @Sutto , @bjeanes and @DrNic who influenced this or had some effect on it even if they don’t know it. We’d already taken one shot at CI earlier in the year and failed, so it’s nice to have the tool for the process now.